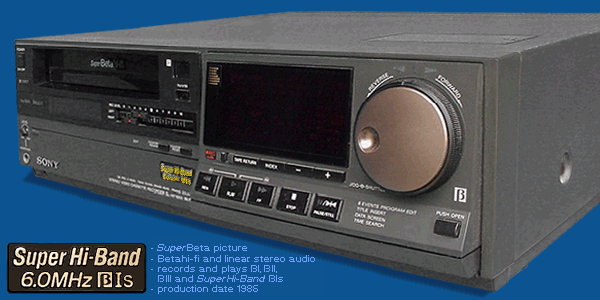
If you are a full-on supporter of the Beta format and know how superior it is to any other then this is paradise. This is the SL-HF3000 that has both Betahi-fi stereo and two linear (stationary) stereo audio tracks. It is like Sony read your mind and heart and then delivered the goods. Its feature list is long, the operation is exceptional and the quality is better than great. This superb Beta is a tremendous value and like all of Sony's high end Betas very innovative. My only objection was why did they take so long to make this for us! This powerhouse finally gave us Sony Beta crusaders everything we hungered for. So much so, that many of these units were purchased in pairs; as in, two at a time (more on that later). I fell in love with this exceptional Beta right out of the box and have adored it ever since. So here for your perusal is a totally partial, congratulatory analysis and loving tribute to this star performer, the clever and intelligent SL-HF3000.
I'll start with the exterior. The cabinet is formidable (see the photo above). Its color is in a rich deep slate with a textured finish that feels creamy to the touch. Sony reserved this special finish just for the SL-HF3000 (and the super high-end EDV-9500 Extended Beta VCR). The SL-HF3000 is larger and heavier than most Beta units. There are a lot of high-end electronics inside that cabinet but I am only going to focus on the features and operation in this commentary. First we look at the rear of the VCR.  THE REAR OF THE SL-HF3000
On the top from the left is the customary UHF/VHF IN and OUT 75Ω threaded RF connectors. Next to these are two interesting control blocks treat offer several connection options. Inside the first CONTROL section is an L socket and T jack. The control-L 5-pin DIN accessory socket was reserved for only the very elite of the Beta line-up. The others are the SL-HF750, SL-HF900, SL-HF3000, EDV-9300, EDV-9500, SL-HF2100, Pioneer VX-90 (SL-HF900 clone) and the professional EDW-30F. This socket provides special 2-way communication between various accessories plus a 9 volt power source. Sony produced several special tools for use with a control-L connection, such as an editor, wired remote and others. The control-T jack is very unique. This is a dedicated 2-way communication port available for editing between two control-T equipped Betas. These are the SL-HF3000, EDV-9300, EDV-9500, EDW-30F or another SL-HF3000. In the CONTROL-S block there are two jacks. These can be used for centralized IR (infrared) operation with other Sony control-S equipped devices. They can also be used to control this Beta or another VCR. Communication is only one way, IN to the VCR or OUT from the VCR. On the next line is the CAMERA REMOTE square. IN is used for a camera to pause the VCR and OUT (EDIT) where the VCR sends a pause signal. Out can control VCRs with camera pause jack. Line inputs and outputs are next. The plugs are arranged AUDIO R and L, left right then PCM/VIDEO. There are two LINE IN options with SL-HF3000. LINE 1 IN here on the back and LINE 2 IN (located on the front). Next is MONITOR OUT which can show on-screen characters and information. These include timer settings, video inserts, title pages and more. LINE OUT sends the video through with no alteration. Not shown above is the power supply cage. It is back here too and it is well ventilated. It has 110 volt power outlet that can be switched by the VCR.  UNDER THE TOP TUNING DOOR
On the top of the cabinet is the small lid that conceals settings that are rarely needed. There is a switch for selecting the incoming COMMAND MODE. It is used to set the VCRs remote mode to match that of the commander, either VTR-1 or VTR-2. This allows two Sony Beta VCRs to be remotely operated independently of each other. This switch is also duplicated on the SL-HF3000 remote commander. There is a STILL (in pause) ADJUST knob for matching the picture stability to the monitor being used. You only adjust this once, if at all. There are buttons to ADD and ERASE the setting of the incoming TV channels and for selecting analog CATV/NORM. There is also the AUTO STEREO (reception) setting for automatically receiving over-the-air stereo. The RF UNIT setting is for selecting either 3CH or 4CH for the VHF going out. After making your selections you can close this lid and pretty much forget it. That is why Sony placed it on top and out of the way. 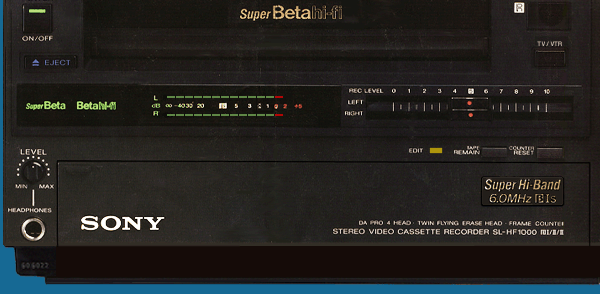 THE LEFT FRONT
Now on to the front. On the left are the ON/OFF and EJECT buttons and the entryway for the cassette. Just below these going left to right are two indicators, one for SuperBeta and one for Betahi-fi. During recording the Betahi-fi indicator is on if stereo has been selected. It goes off if a tape being played isn't in stereo. The SuperBeta light comes on to show that the switch set to record the highest quality picture. It doesn't tell you if the tape being played is in SuperBeta or not. No model that I know ever alerted you that the picture was in SuperBeta. It would be nice to know this, but since this VCR plays any Beta tape regardless (except ED Beta) I guess it really doesn't matter. Next to it there is a 15 segment volume display and to the right of this are the slides for adjusting the audio in. Just below these slides are the EDIT LED that lights up yellow when this function is being used. Next to it a TAPE REMAIN button. When pressed the display indicates how much time remains on the tape based upon the length selected, L-500, L-750 or L-830. The COUNTER RESET button returns the HMS (hours, minutes and seconds) numbers to all zeros. On the lower left beside the SONY logo is the stereo HEADPHONES jack with is its LEVEL (volume) control above it.  THE RIGHT FRONT
On the front all the way to the right beside the display is the JOG wheel and SHUTTLE ring. Under certain conditions these give the operator supreme command over tape movement during pause, plus it does some other neat tricks (more on those later). Just right of center is the fluorescent display. And it is big, but it conveys a lot of useful information. Only the time and cassette inside (square symbol) are displayed when the machine is off. But when you turn on the VCR it conveys a wealth of information. Important, useful details like if the tape location in real time. In hours, minutes and seconds (HMS). It shows the tape speed when playing or recording, the type of line input you are using, or if a stereo input is being received and much more. Where this display really shines though is when you are performing one of this VCRs many special magic tricks (more on those and the display later). Below the display Sony did a very good job of positioning all the frequently used function buttons. They are conveniently located and readily accessible for quick, easy access. Left to right is the REC (record) slide switch, INDEX search buton, TAPE RETURN and -/+ (up and down) channel searching buttons. Below these are the standard tape transport buttons for REW (rewind), PLAY, etc. Controls for managing special features and timer functions are smartly located on a very handy slide out drawer that is becomes available using the PUSH OPEN button. I find the drawer especially well thought out and easy to operate (more on this drawer later). 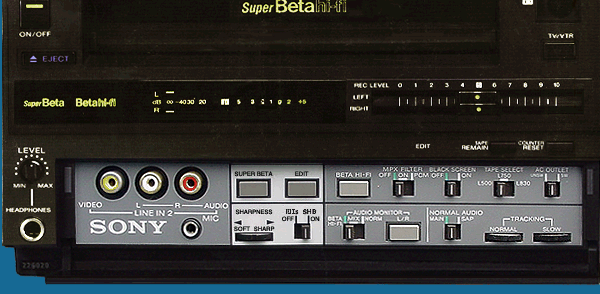 BEHIND THE COMPONENT DOOR BEHIND THE COMPONENT DOOR
Back on the left under the cassette entryway is the component door. In here on the left are the LINE IN 2 jacks. Below them there is the socket for the stereo MIC (microphone) input. In the white area next to the A/V inputs is a button for turning off SuperBeta. There is also a button for turning on the EDIT function. Pressing this to ON will light the EDIT LED and allows this VCR to simultaneously control the pause function of a Sony VCR with a control-S IN function. There is a scroll knob for selecting picture sharpness and a switch for selecting either  s or Super Hi-Band. This switch and the SuperBeta button are there was so you could make recordings without these picture enhancements. This VCR is completely backward compatible but if you are recording tapes to be played on a standard Beta machine, you might want these off. This elevated signal can cause picture noise (sparkles). SuperBeta has a higher luminance signal than a standard Beta VCRs can handle, this gives you the option to turn it off. Also in this highlighted white area is the SHARPNESS knob. Adjusting this makes the playback picture go from smooth to sharp. To the right of this is the ON/OFF switch for the s SHB (Super Hi-Band 6.0 MHz) switch. This selection is only functional during recording in s. s or Super Hi-Band. This switch and the SuperBeta button are there was so you could make recordings without these picture enhancements. This VCR is completely backward compatible but if you are recording tapes to be played on a standard Beta machine, you might want these off. This elevated signal can cause picture noise (sparkles). SuperBeta has a higher luminance signal than a standard Beta VCRs can handle, this gives you the option to turn it off. Also in this highlighted white area is the SHARPNESS knob. Adjusting this makes the playback picture go from smooth to sharp. To the right of this is the ON/OFF switch for the s SHB (Super Hi-Band 6.0 MHz) switch. This selection is only functional during recording in s.Leaving the white area and moving from left to right on the top row is the BETA HI-FI stereo button, It can be toggled between on and off and it is there to allow you to turn off Betahi-fi during recording audio. Doing this records the audio only on the monaural (linear) track. Next to this is the MPX (multiplex) FILTER switch. Normal position, indicated by the green stripe, is OFF. ON is used for recording FM broadcasts to reduce over-the-air signal noise. PCM OFF is for turning off the dropout compensation circuit when playing PCM recordings (more on PCM can be found in the TERMS panel and elsewhere in this Site). The next switch is for turning ON or OFF the BLACK SCREEN. This switch produces a black screen through the monitor out video jack. If you are generating title pages during recording or editing this allows them to be displayed over a solid black background (more on this later). Normal position for this switch is OFF. Forget and leave it ON and you might think you have video p problem when all you see is a blank monitor. Examples of uses for this black screen can be seen below. This Betamax can produce these screens and many more. 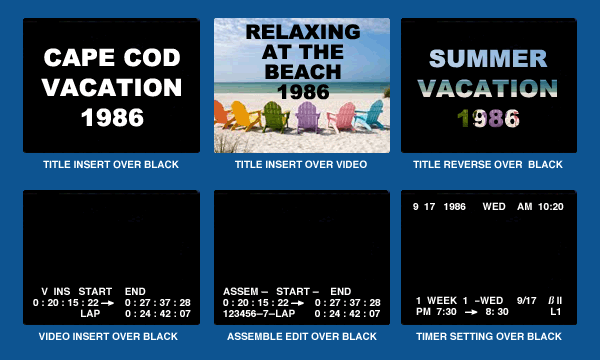
SOME SAMPLES OF ON-SCREEN DISPLAYS 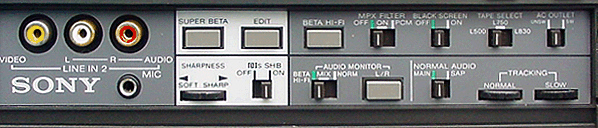 CLOSE UP OF BEHIND THE DOOR 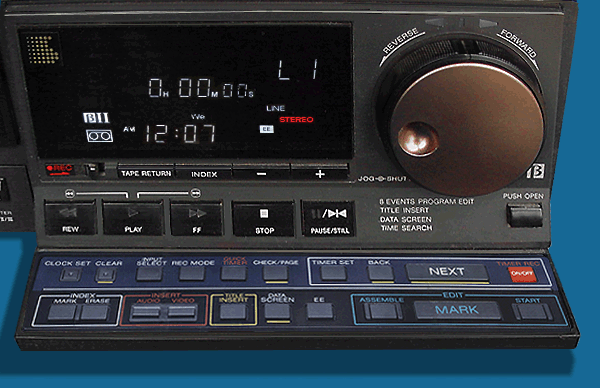 THE SLIDE OUT DRAWER
Now things are really going to heat up. Back over on the right front just below the jog wheel is the PUSH OPEN button. Press this and a special drawer glides out smoothly to reveals itself. This opening action is fluid dampened and has a feel of superior quality. To hide it you just push it back in and it locks closed. This desk-like work surface has all of our editing options, plus a lot more. Oh, the joy! I have been hinting about some of these functions and now I think you will find it has been worth the wait. To start with the SL-HF3000 can perform some truly impressive composing and editing feats. Some found on no other VCR. Remember I mentioned earlier that some consumers bought these babies in pairs. Strange thing, say you? Not at all. Here's why. You can hook two of these VCRs together and they will communicate with each other. They can digitally instruct one another to carry out certain paired commands. Some function require using a special control-T cable, which is a crossed connected mini-cable. Check this out. Once joined together the player (master or controlling VCR) can be programmed with the locations of 8 segments to be played from a master recording and sent to a tape being recorded using another SL-HF3000 (or SL-HF1000, EDV-9300 or EDV-9500). The master will control the slave and assemble the edits in your chosen order to the target tape. The edits on the newly edited tape will be near prefect and seamless. This is called assemble editing. But it is not your only option. You can do preroll editing, insert editing and more. Up until now this versatility was only available with professional Betas, and then only when used with a separate controller operating between the units. The SL-HF3000 also has control-S that allows it to synchronize the pause function of a compatible Betamax. To learn more about assemble and insert editing click here. This panel will change but you will have the option to come back to this review. You can use these unique abilities for compiling scenes, editing content or inserting video. These are just some of the editing options but I want to cover only one in detail. It's the one I used the most and I found to be the most valuable. It is scene to scene automatic pre-roll assemble editing. The first time you see these Betas perform this marvel it is jaw dropping.  THE DRAWER CLOSE UP Looking at the close up of the drawer the controls for doing the automatic editing are inside the green rectangle on the right designated as EDIT. Three buttons here are marked ASSEMBLE, MARK and START. The programming procedure is straightforward, simple and easy to understand. (To examine an operational chart showing how the pre-roll editing sequencing looks for both the VCRs click here. This panel will change but you will have the option to come back to this review.) The first step to perform controlled editing is to couple two VCRs together (SL-HF3000, SL-HF3000, EDV-9500, EDV-9300 or EDW-30F) with the special control-T cable. It plugs into the mini jack in the back of the machines. After being paired one unit can be used as the master (player) and the other as the slave (recorder). You are now ready to perform pre-programmed pre-roll edits* from one unit over to the other. Into the master (player) you insert the tape that has the scenes you want to compile into a new recording. Into the slave goes the tape you want as the destination. To begin programming you press ASSEMBLE on the keypad. The display changes to indicate START (flashing) and END in hours, minutes and seconds. See picture below. This same information can also be seen on the TV monitor (see the bottom sample screen shots shown earlier) from the MONITOR out jack. 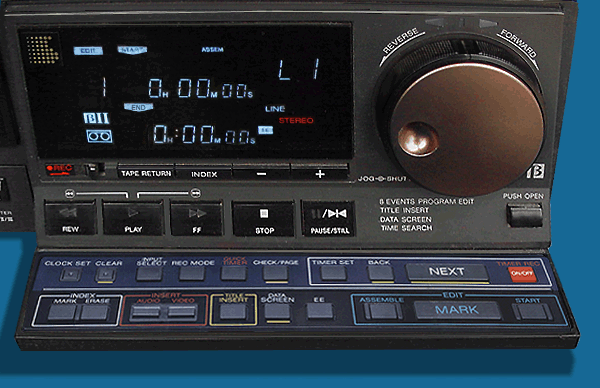 THE DISPLAY DURING ASSEMBLE EDITING On the player locate the desired scenes starting point and press MARK. END will then begin to flash, the VCR is now waiting for the ending point. Once you locate where you want the scene to end you press the MARK button again. That segment is now in memory and is so designated in the display (and monitor) as EDIT number 1. You can do this up to eight times (and they can be in any order). After you have all your desired segments programmed you are now ready to set up the slave unit. Here you find the starting point of where you want the new material to be added and you put this VCR in pause (standby) mode. Now you are ready. On the master VCR press START. It will now search for and find the first segment (number 1). Once it arrives at the starting point of the first program it too will go into pause and then reverse scan (pre-roll) both VCRs backwards a short distance. Playback will then begin on both units and when the programmed edit point arrives the slave will switch to recording (on the fly). After the desired segment is recorded the slave will go into pause while the master scans and locates the next segment. This process continues until all the segments have been recorded. Each time finding the next edit point, then pre-rolling both tapes and adding the scene as instructed. When completed both VCRs go into pause and await further instructions. Both units do all this unassisted after pressing the START button the first time. The only thing that can get in the way are imperfections in the tapes or in the recordings. It also helps if the recording speeds are the same, and you can't change from one speed to the other inside an edit. (The VCR won't let you make that mistake.) So what is it that makes pre-roll assemble editing so desirable that Sony featured it in this top of the line Beta? If you have ever done any crash or butt editing you know that it creates a noticeable glitch in the picture at the junction point. This happens because the capstan has to spin up from a dead stop (pause) before recording starts. This causes a slight delay and a recording overlap. Sony does a respectable job cleaning up these type of edits by using something called micro-timing-phase recording (µTP see VCR description). With µTP after starting the VCR from pause it looks for the starting pulse of the incoming frame and tries to match it. The problem with this is that it doesn't find the very beginning of the last recording because the capstan is playing catch up. This video overlap is noticeable as a snap or rainbow pattern for a micro-second or two between the scenes. The only way to get a perfectly clean edit is to pre-roll both tapes and start the recording on the fly (both capstans already turning). Pre-roll edits are almost always perfect on the SL-HF3000. Special editing is not all this glide out drawer has to offer. There are a number of other handy goodies available.
THE DRAWER CLOSE UP ,  or or  tape speeds. This sets the recording speed, as you recall the picture and sound options are located behind the front door. QUICK TIMER is next. Very convenient when you want to cut to the chase. Press this button once and recording starts immediately. Press it again and 30 shows on the display and you have added 30 minutes to the recording that just stared. Doing it again adds another 30, and again, up to a total of five hours. Pause still works in Quick Timer as do input changes, speed and time remaining. Pressing the red TIMER REC ON/OFF button aborts recording altogether. CHECK/PAGE is for reviewing your timer settings and any title pages you have saved (more on this later). Now for the buttons in the timer setting block. This keypad has several functions. One is to enter the times for unassisted future recordings. You do this by pressing TIMER SET. On the display and from video monitor out will appear a request for the first start time. After setting press NEXT to go to the stop time, then input, to next recording, etc. If you make a mistake there is a very convenient BACK button. If you get lost you can press CHECK/PAGE to see the settings and then BACK to make any changes. You put the machine into timer ready mode by pressing the TIMER REC ON/OFF button. The BACK and NEXT buttons also work the same way for setting the clock, composing pages or going through stored data.
DRAWER CLOSE UP tape speeds. This sets the recording speed, as you recall the picture and sound options are located behind the front door. QUICK TIMER is next. Very convenient when you want to cut to the chase. Press this button once and recording starts immediately. Press it again and 30 shows on the display and you have added 30 minutes to the recording that just stared. Doing it again adds another 30, and again, up to a total of five hours. Pause still works in Quick Timer as do input changes, speed and time remaining. Pressing the red TIMER REC ON/OFF button aborts recording altogether. CHECK/PAGE is for reviewing your timer settings and any title pages you have saved (more on this later). Now for the buttons in the timer setting block. This keypad has several functions. One is to enter the times for unassisted future recordings. You do this by pressing TIMER SET. On the display and from video monitor out will appear a request for the first start time. After setting press NEXT to go to the stop time, then input, to next recording, etc. If you make a mistake there is a very convenient BACK button. If you get lost you can press CHECK/PAGE to see the settings and then BACK to make any changes. You put the machine into timer ready mode by pressing the TIMER REC ON/OFF button. The BACK and NEXT buttons also work the same way for setting the clock, composing pages or going through stored data.
DRAWER CLOSE UP
Now for the bottom row of buttons from the left. The first square surrounded in yellow is labeled INDEX: MARK and ERASE. Every time you start a new recording the SL-HF3000 places an inaudible tone, called an index mark, in the normal audio track. These are put there so you can search for locations by these tones (index). Up to nineteen spots can be searched. You can also add these tones wherever you want and erase the ones you don't want. Index locations are shown in the display as they go by. The button for searching by index is below the display and next to the TAPE RETURN button. Pressing tape return takes your tape back to the all zeros location on the display by either rewind or fast forward. The next block of buttons are the INSERT: AUDIO and VIDEO. You can separately overwrite and insert the LEFT and RIGHT stationary stereo audio tracks by pressing the AUDIO button. The selection toggles R/L/LR for selecting which tracks or both to overwrite. The VIDEO button inserts a new scene over the current one. The SL-HF3000 has flying erase heads which allows it to insert (overwrite) a scene without disturbing the trailing video. The next button over is the TITLE INSERT button. Press this and you can place up to eight different previously composed title pages into your recording. Things like "HOW WE SPENT OUR SUMMER VACATION" or "BABY'S FIRST BIRTHDAY" (see the graphic of the on-screen displays). Letters are in all caps and available in several sizes. They can be black, white or reversed. You can also include the speed and other data in the recording if you wish. The next button is designated EE. Press this to see the incoming signal while playing a tape. The EDIT box all the way to the right we already discussed. Below for reference I have included a picture of all the characters that the display can exhibit during the different modes of operation. 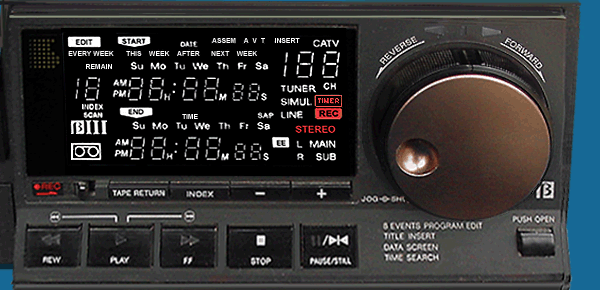 THE FULL DISPLAY, JOG WHEEL AND SHUTTLE RING THE FULL DISPLAY, JOG WHEEL AND SHUTTLE RING
 THE SL-HF3000 REMOTE RMT-147 THE SL-HF3000 REMOTE RMT-147
Now for the most information of all, how it measures up in the recording department. The SL-HF3000 records and reproduces a gorgeous picture through the entire NTSC color spectrum. It is top-quality in every way. The Super Hi-Band Beta s recording speed pops the luminance signal up to 6.0MHz. This highest level of picture performance ensures that the detail, sharpness and resolution is going to be the very best you can obtain using conventional chromium, cobalt or iron oxide video tapes. Upping the luminance any higher would require a new formula tape with greater particle density. Something that became obtainable only after the refinement of evaporated metal (EM) cobalt-alloy video tape in the late 1980s. As you probably know EM tape was adapted for use in some later Beta models. But when the SL-HF3000 came out this was the optimum recording quality obtainable in any consumer VCR. While s is the superior speed, for most general recordings SuperBeta is more than capable. You have to look pretty hard and have a large monitor to really notice the difference between the two. The slowest SuperBeta speed that records the most time isn't quite as sharp as SuperBeta but it is still better than most any other consumer VCR (using its slowest, long play speed).
The Betahi-fi stereo in all speeds is simply magnificent. The regular monaural track is what you would expect with the fastest s speed producing the best linear (monaural) audio response. Put it all together and the SL-HF3000 is impressive, formidable and smart. It is 1 fine Beta.
*Other edits such as insert, butt and simple edits can be also be performed using the SL-HF3000. ©Misterßetamax go to homepage |