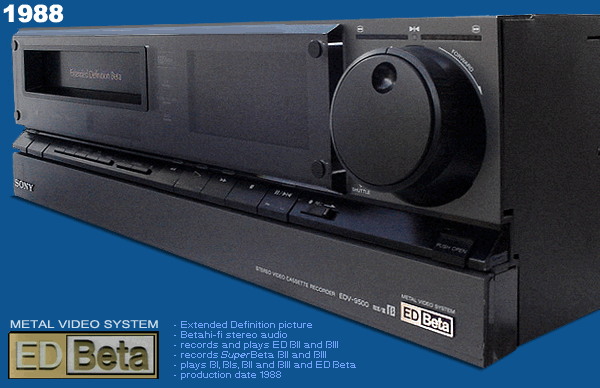
Just when you thought the Betamax couldn't get better along comes Sony with something new and exciting. The ED Beta format provided a new level of performance unmatched in any VCR. Once again Sony upped the Luminance signal. This time to 8.0 MHz which now meant that the VCR could record 550 lines of resolution. This now duplicated the broadcast signal of the day. No VCR ever duplicated this quality. VHS tried with HQ VCRs but because of their smaller drum the best they could manage was 400 lines. ED Beta, called the "Metal Video System" required a new formula tape. EDV-9500 and EDV-9300 are almost the same recorder. The only difference in the cabinet is black for the EDV-9300 and it has decorative wooden sides. The EDV-9500 has a clay colored colored and no dress trim.
If you really appreciated the beta format and knew how well it performed then this was your seventh heaven. It was like Sony read your mind. The feature list is long, the operation exceptional and the quality is sensational. It was very expensive, but almost all of Sony's high end Betas were. My only complaint was why did they take so long to make it for us! This powerhouse finally gave Sony Beta owners everything they craved. It was appreciated so much that many SL-HF1000 VCRs were purchased in pairs, as in, two at a time (more on that later). So here for your perusal is a totally biased, congratulatory analysis and loving tribute to this star performer. Starting with the cabinet it is elegant and formidable. The exterior is a rich deep slate color that feels creamy to the touch. Sony reserved this finish for the SL-HF1000. This VCR is also larger than most and it is heavy. There are a lot of electronics inside this cabinet but I am only going to focus on the exterior design and operation in this commentary. In the back of the SL-HF1000 is a set of audio/video input jacks and two sets of outputs. One set provides unaltered audio and video and the other is for passing the on-screen visual effects. There are also control-T, control-S in/out, control-L and RF in/out connectors.The power supply is back here too and it is well ventilated, because this baby uses some volts. On the top is the small tuning lid. Under this small square are the controls for setting the incoming remote control mode to channel VTR 1 or VTR 2. Having two choices allows two VCRs to be operated independently by remote without disturbing each other. There is a still adjust knob for adjusting the picture stability (jitter) in pause. You only do this once, if at all. There are buttons for setting the incoming TV channels and selecting CATV. Also switches for choosing AUTO STEREO reception and setting the RF (antenna) out to channel 3 or 4. After making your selections here you can close this lid and pretty much forget it. That is why it is on top and out of the way. On the front Sony did a spectacular job of positioning all the frequently used function buttons. RIGHT SIDE OF THE FRONT The tape handling buttons are easy to so conveniently located they are fun to use. The frequently needed buttons are always available for quick, easy access. The controls for setting up operational parameters and special functions are safely secured behind doors, or on a very handy slide out drawer. I find the drawer especially well thought out and easy to understand. The advanced operating options and functions located here are smartly laid out for comfortable, easy access. On the front all the way to the right is the jog wheel and speed ring. Under certain conditions this jog arrangement gives the operator supreme control over tape movement during video playback (more on this later). Just right of center is the fluorescent display, and it is big. But it conveys a lot of useful information. It shows only the time when the machine is off. But when you turn on the VCR it displays a wealth of information. Important, useful details are shown. Like tape location in real time HMS (hours, minutes and seconds), tape speed indication when playing or recording, it notifies there is cassette inside, shows the type of line input you are using and if a stereo input is being used and more. Where this display really shines though is when you are performing one of this VCRs many special magic tricks (more on these later). Did I mention that the manual for this SL-HF1000 is a quarter inch thick? It is well thought out and easy to read. Makes understanding this stellar machine a breeze. 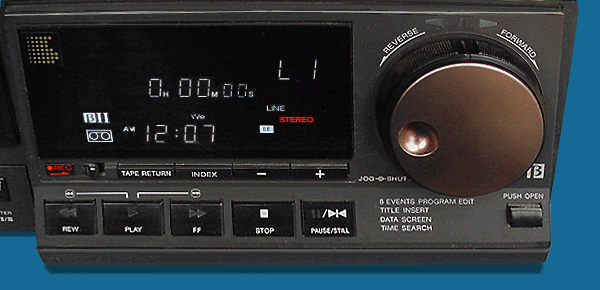 TOP TUNING DOOR
LEFT FRONT The cassette entryway is on the left and there is a 15 segment R/L volume indicator located under it. To the right of this display are the slides for making audio adjustments. On the extreme left are two indicators, one for SuperBeta and one for Betahi-fi. They light up a cool green under certain conditions to indicate the type of recording selected. During playback the Betahi-fi indicator goes off if the tape isn't in stereo. Alas the SuperBeta light stays on just to show what position you have switch set. It doesn't tell you if the tape being played is in SuperBeta or not. No Beta VCR that I know ever alerted you if the picture was in SuperBeta. It would be nice to know but since this VCR plays any tape recorded in any manner I guess really it doesn't matter. Overall this VCR screams quality and professionalism. And does it ever deliver.
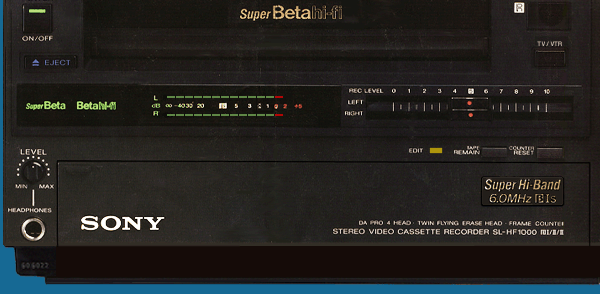
First up is the glorious picture this recorder produces. It is superior in every way. SuperBeta  s recording capability boosts the luminance signal up to 6.0MHz. This means that sharpness and resolution is going to be about the best you can get using conventional video tape. Going any higher would require a higher magnetic density, something only obtainable by changing the composition to evaporated metal. As you probably know this did happen later with some future models but when the SL-HF1000 came out this was the optimum obtainable. The highest quality picture is only available at this highest speed, s. SuperBeta s recording capability boosts the luminance signal up to 6.0MHz. This means that sharpness and resolution is going to be about the best you can get using conventional video tape. Going any higher would require a higher magnetic density, something only obtainable by changing the composition to evaporated metal. As you probably know this did happen later with some future models but when the SL-HF1000 came out this was the optimum obtainable. The highest quality picture is only available at this highest speed, s. SuperBeta  and and  are almost as good. The recordings are clean, crisp and steady as a rock. The Betahi-fi stereo is simply magnificent. The regular monaural track is what you would expect with the tape moving so slow. The fastest s speed produces the best mono audio. Behind the front panel door are controls that let you select picture sharpness, adjust tracking, turn off the Betahi-fi, SuperBeta and s (Sony called this Super Hi-Band). This was so you could record without these enhancements (even though the VCR is completely backward compatible). If you use this Beta for making copies there are also some special switches here to tweak the picture output and select separate audio tracks (more on that later). are almost as good. The recordings are clean, crisp and steady as a rock. The Betahi-fi stereo is simply magnificent. The regular monaural track is what you would expect with the tape moving so slow. The fastest s speed produces the best mono audio. Behind the front panel door are controls that let you select picture sharpness, adjust tracking, turn off the Betahi-fi, SuperBeta and s (Sony called this Super Hi-Band). This was so you could record without these enhancements (even though the VCR is completely backward compatible). If you use this Beta for making copies there are also some special switches here to tweak the picture output and select separate audio tracks (more on that later). BEHIND THE FRONT DOOR
It's all been outstanding so far but now things are really going to heat up. Not only do you great video and audio prowess but the SL-HF1000 performs some truly impressive viewing, display and editing feats. Some found on no other VCR. I have been hinting about some of these and now I think you will find it was worth the wait. I mentioned that some consumers bought these babies in pairs. Strange thing say you? Not when you consider that you can hook two together for pre-roll editing and program up to 8 segments to dub in any order. This is called assemble editing and previously it was only available from the professional Betas, and then only when using a separate controller between the units. The SL-HF1000 comes with the software built in to control another SL-HF1000 in several special ways. It can control other Sony Betas too but not to the extent of using these units as both the master and slave. You can use this unique capacity for compiling scenes, editing content or inserting video. These are only some of the editing options but I want to only cover one in detail. It's the one I used the most and found to be the most valuable. It is scene to scene pre-roll assemble editing. The first time you see these Betas perform this function it is jaw dropping. Controls for editing are found on the slide out drawer located under the function buttons. Pressing the PUSH OPEN button smoothly slides the special panel out.
SLIDE OUT DRAWER
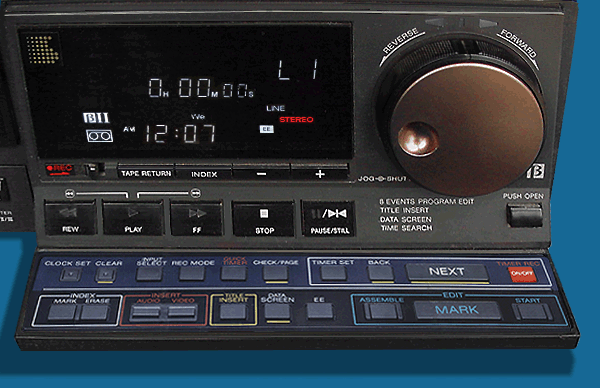
DRAWER CLOSE UP  In the close up above notice the keypad arrangement inside the blue box designated as EDIT. The three buttons here are marked ASSEMBLE, MARK and START. The editing process is deceptively simple and easy to program and understand. The set it up is straight forward. To join the VCRs a special cable, called a control-T patch cord, plugs into the back of two units. Now paired one is used as the master (player) and it will control the other as the slave (recorder). You are now ready to do pre-programmed pre-roll edits* from one unit to the other. Into the master (player) you insert the tape that has the scenes you want to use to create a new recording. Into the slave goes the tape you want to become your compilation. To begin set up you press ASSEMBLE on the keypad. The display changes to indicate that programming can begin. Next you find the point where you want your playback to start and press MARK. Then you run through this new material until you find the point where you want the playback to end. You press MARK again. That segment is now in memory. You can do this up to eight times and when you have all your desired segments programmed in you are ready to set up the slave unit. With this unit you find the point where you want the new material to start and put this VCR in pause. Next you go to the master VCR and press play, then pause then START. It will now search for and find the first segment (they can be in any order). Once it arrives at the first program starting point the master also go into pause and then it will reverse scan back both VCRs a small distance. Next playback begins on both units and when the edit point arrives the slave will switch to recording. After the desired segment is recorded both units will go into pause while the master scans to locate the next segment. This process continues until all the segment have been recorded on the slave VCR. Each time finding the next edit point, then pre-rolling both tapes and adding the scene as instructed. Once all segments are completed both VCRs go into pause and await further instructions. It does all this unassisted after you have programmed your edits and press the START button. The only thing that gets in the way are imperfections in the tapes or the recordings. It also helps if the recording speeds are the same, and you can't change from one speed to the other inside an edit. The VCR won't let you make that mistake. What makes pre-roll editing so desirable that Sony included it in this top of the line Beta? If you have ever done any editing creates a noticeable glitch. It happens because the recorder capstan is starting up from a standby position. It has to spin up to speed before recording can start. Sony does a good job with these type of edits by using something called micro-timing-phase recording. Which means the VCR looks for start of the incoming frame and tries to match it. The problem with this is that it doesn't find the very beginning of the last recording because the capstan is delayed as it spins up from pause. The video union is noticeable as a snap or rainbow pattern for a second or two between the scenes. The only way to get a perfectly clean edit is to pre-roll both tapes and start the recording on the fly. Pre-roll edits are almost always perfect on the SL-HF1000. But the fun doesn't stop there. Look at all the other neat functions that are available on this slide out drawer. DRAWER CLOSE UP Going left to right from the top first is the CLOCK SET button. It is recessed slightly to avoid accidental activation. Setting the clock is shown on the front display and can also be seen on the television screen. The SL-HF1000 also has on-screen display. The center video output in the back passes this information on while the other video output always shows just the picture only. With two monitors options like this you can watch the data on one while passing a clean picture through with the other. Let me say this about the clock, which also ties in with the timer. You can set it for any year between 1996 to 2085. Very good news because this VCR is over thirty years. Sony gives you the option print the date and time on your recordings. You can do the same with elapsed time and the individual frame numbers (see screen shots below). For timer recordings you can only go twenty-one days in advance with eight programs or everyday. If there is a power outage the VCR will save all your settings for over ten minutes. Next to the clock set is the CLEAR button, which is also recessed. This is your do over button. Press this and any data already entered is wiped out. Next to it is the INPUT SELECT. Here you have four options. They are: tuner, simulcast (SAP) with tuner, line one in or line two in. (Line two in is on the front of this VCR behind the front component door.) The REC MODE for selecting the , or recording tape speed. The picture and sound options are located behind the front door. QUICK TIMER is next. Very convenient when you want to cut to the chase. Press this button once and recording starts immediately. Press it again and 30 shows on the display and you have added 30 minutes to the recording that just stared. Doing it again adds another 30, and again, up to a total of five hours. Pressing the red TIMER REC ON/OFF button aborts this recording if you have made a mistake. CHECK/PAGE is for reviewing your timer settings and any title pages you have saved (more on this later). Now for the buttons in the timer setting block. This keypad has several functions. One is to enter the times for unassisted future recordings. You do this by pressing TIMER SET. On the display and on a TV monitor will appear a request for the first start time. After setting press NEXT to go to the stop time, then input, to next recording, etc. If you make a mistake there is a very convenient BACK button. If you get lost you can press CHECK/PAGE to see the settings and then BACK to make any changes. You put the machine into ready standby mode by pressing the TIMER REC ON/OFF button. The BACK and NEXT buttons works the same way for setting the clock, composing pages or going through stored data.
DRAWER CLOSE UP Now the bottom row of buttons from the left. The first block are labeled INDEX: MARK and ERASE. Every time you start a new recording the SL-HF1000 places an inaudible tone, called the index mark, on the normal audio track. These are put there so you can search for locations by their index. Up to nineteen stops can be searched. You can also add these tones wherever you want and erase the ones you don't want. These are the buttons for controlling the index marking. Index mark numbers are shown on the display. The INDEX SEARCH button is below the display and next to the TAPE RETURN button. Tape return takes your tape back to the zero location on the display. The next block of buttons are the INSERT: AUDIO and VIDEO. You can overwrite and add sound to the normal audio track by pressing the AUDIO button. Same thing goes for the VIDEO button. Because the SL-HF1000 has flying erase heads you can insert video into a scene by using the video button. The next button over is the TITLE INSERT button. Press this and you can place up to eight different title pages that you have previously composed over the video going out (from the center video output). Things like "HOW WE SENT OUR SUMMER VACATION" or "BABY'S FIRST BIRTHDAY" (see below). Letters are in all caps and available in several sizes. You can also show the record the speed and other data if you wish. The next button is designated EE and you press this to see the incoming signal while playing a tape. The EDIT box all the way to the right we already discussed. BEHIND THE FRONT DOOR
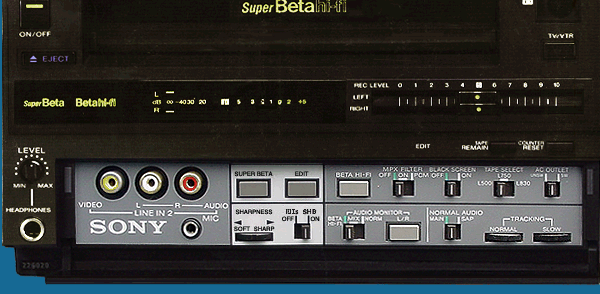
On the left front beside the drop down door is the headphones jack and its volume control. Behind the drop down door are the selection buttons, switches and line 2 in jacks. Next to the A/V jacks is the stereo microphone jack. Moving from left to right is the SUPER BETA button that toggles between on and off. Beside it is the EDIT button used to turn off the video processing during dubbing and to link this VCR with Sony units that have control-S inputs. Next is the BETA HI-FI button for selecting whether to record in Betahi-fi stereo or not. Beside this is the MPX switch, which stands for multiplex filter. Normal position, indicated by the green bar, is OFF. ON is used for recording FM broadcasts to reduce signal noise. PCM OFF is for turning off the dropout compensation circuit when playing PCM recordings (more on this can be found in the TERMS panel and elsewhere in this Site). The normal position for this switch is off. The next switch is for the BLACK SCREEN. This is the only Beta to have this as an option. If you don't want your titles to appear over the video and would rather have them appear on a solid black background this is how you do it.
SOME SAMPLES OF ON-SCREEN DISPLAYS TAPE SELECT lets you select which length tape is inside and when you press the TAPE REMAIN button above it the VCR will compute how much time remains on the tape and show this approximation on the display. Lastly is the AC OUTLET switch which lets you select if you want the outlet in the back to be on all the time or only come on when the VCR does. Starting from the bottom center is the SHARPNESS knob. Adjusting this takes the playback picture from smooth to sharp. To the right of this is the 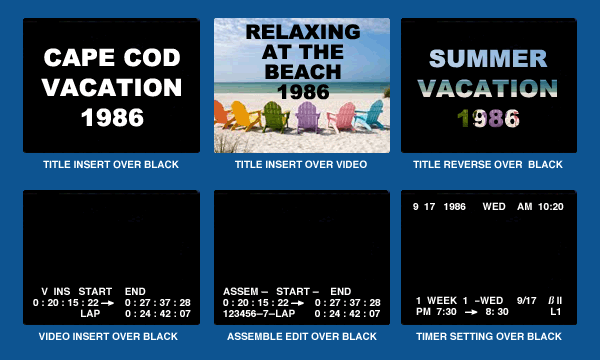
To check recordings press CHECK/PAGE BUTTON s/SHB (Super Hi-Band) switch. This only affects recording in . You have the choice of either OFF to refrain from recording in the 6.0 MHz high band mode or ON for doing so. Next is the AUDIO MONITOR switch. Here you have the option to listen during playback to the BETA HI-FI tracks, the NORM (normal monaural) track or to MIX the two together. The green bar indicates BETA HI-FI is preferred. The AUDIO MONITOR area also has a L/R button that when pressed lets you select playing only the BetaJOG WHEEL AND SHUTTLE RING
It's like Sony made me something I didn't know I wanted and it turned out to be something I couldn't live without. Sony connected almost all the repetitive tasks to the jog wheel. Yes you can put the picture in pause and step through it in forward and reverse, but you can do so much more. Turning this wheel with your finger sends a series of pulses that can be used to advance and reverse data. To quickly go through date, clock and timer setting, It can also be used to create title pages.
Title pages are created by pressing the TITLE INSERT button. The jog wheel is used to move through the alphabet and symbols. This greatly speeds up the process and becomes intuitive after a short time. The shuttle ring lets you shift from 1/10, 1/5, x1, x2 and scan in forward reverse while in pause. This jog wheel and more is also found on the remote.
SL-HF1000 REMOTE RMT-148
I am not going to go in to great detail about the wireless remote. The picture above says it all. Almost every function is there right down to video and audio insert, even eject. The wonderful jog wheel and shuttle are there too. Keep good strong batteries in this and you never will have to touch the VCR, well almost never. There is a helpful function that is available that isn't on the VCR. It is called TIME SEARCH and it lets you set a time on the display where you want the VCR to send the tape to and then stop or start. Handy when you know the HMS of a particular scene you want to locate.
There are more features but it is kind of fun to discover these while you are getting comfortable with the most often used functions and controls. You could spend an evening reading through the owner's manual and it is a fun read. Sony did their best to convey all the motions and steps needed to put this Beta through its paces. But the real fun comes in when you see that it delivers everything as promised and more. *To see an operational chart showing how the pre-roll editing sequence looks for both VCRS click here. This panel will change but you will have the option to come back to this review. |