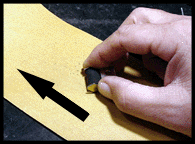
Now that the pinch roller is removed you are going to clean it. Using the solvent and the wipes provided dampen a single wipe and clean the roller by turning it while pressing the solvent wet cloth against it. Do this several times to get all the glazing off the rubber. If it is stubborn locate the garnet paper and lay it rough side up on a flat surface. You may want to tape it down to secure it and make it lay flat. Take the pinch roller and roll it across the paper at a 45 degree angle while applying light pressure. Be careful not to sand your fingers. (See illustration.)
 |
|
Only stroke across the paper
a few times then check your results. What you want, is to revitalize
the rubber while removing only the slick oxidized
residue from the surface. Do it too much and you will change
its shape and therefore, ruin the roller. After revitalizing
clean the rubber surface with the lint free towel moistened with solvent.
For a better look at the pinch roller click on this link: Pinch roller assembly. |
Do not install the pinch roller at this time. Next we are going to change the position of the loading assembly and tape path components. To go to that step click here. To go back to the previous panel click here.
|
