Carefully plug your Beta into an AC outlet. ATTENTION!
SHOCK HAZARD! Next, turn it on. ATTENTION! SHOCK
HAZARD! You are now going to trick your machine into thinking it
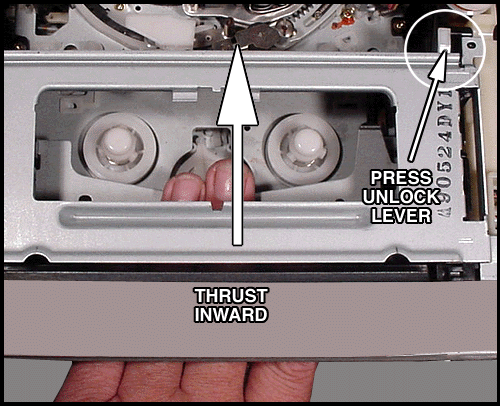
has loaded a cassette. To do this you will need to place your hand through and into into the loading assembly
as illustrated below (large photo) and press the unlock lever at the same
time. (I suggest you read completely through this procedure before you attempt to perform this operation.) If you wish view the picture in a pop out panel click here. Thrust your hand gently inwards, this will cause the carrier to
move forward and down just as if it were loading a cassette. DON'T follow
the loader with in your hand as it operates, you only want to start the
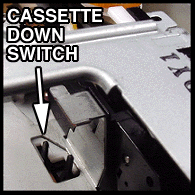
cassette loading action. Once the assembly is in and down you must press
the cassette down switch within two seconds. The unit will then start
the tape threading process. Consult the next photo, under the one directly
below, for a typical location for this switch. If you should fail to synchronize
your actions properly, all that is going to happen is the process
will abort and the carrier will return back to top. Should this occur
you will want to have your hand out of the loading compartment. It most
likely wouldn't hurt your hand if it got in the way, but it could come
as a surprise. (Please read the loader design notice note below.) 
Please note: The loading compartment design shown above is the most common. Even though it may not look exactly like yours the components and method will work with most models. Almost all front loading Beta VCRs will have a locking device to prevent unintentional travel of the loader into the machine. Some machines will have two locks located just behind the front door, near the gripping fingers in the top of the tray. Some have two sliding levers in the rear of the tray on either side at the bottom. You may have to fish around and experiment a little to see just what is needed to unlock and release your loader. Many Sanyo front loader models don't use the tray locking method, a gravity weight blocks the tape entry (firm forward pressure is all that is needed to start them loading). Top loading units have no unlocking system. The location of the cassette down switch varies too. The one shown above is the most common but as mentioned some are located on the bottom of the compartment near the center front. Others are on the left side. Once again you may need to hunt around to find it. As explained above be ready to press it down quickly after the loading tray bottoms out. (So the CPU doesn't time out, see a fault, reverse loading and then eject.) Top loaders perform threading by pressing only the cassette down switch. The easiest way to get to it is to remove the top cover of the cassette holder. If you are attempting to clean a unit with the draw bridge type loader you will have to use a specially altered cassette for false loading. These machines are the |
