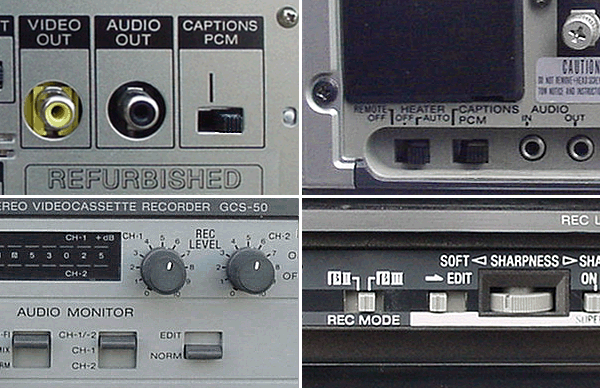
Shortly after the introduction of the Betamax VCR, Sony offered a digital stereo audio recording system known as Pulse Code Modulation (PCM for short). It used a separate device known as a decoder to convert analog stereo audio into a digital code (logic on and off pulses). This was then recorded onto videotape using a Betamax. When it was played back through the decoder, the resulting stereo audio was almost perfect, with zero distortion. This was similar to what is used in CDs, but not the same as Betahi-fi, which came later. To learn more about PCM recording and the decoder, go to PCM in my "Betamax Accessories" section. (Or go to FIND and check out the additional panels available.) Almost all Betas will record a PCM signal without issue, but playback requires that the Drop Out Compensation circuit or DOC of the VCR be disabled. What is the DOC? It is a unique video correction circuit used in all VCRs to compensate for lost or missing information caused by minor imperfections common to all videotape recording media. Without it, you would see more dropouts, white lines,, or streaks in your playback picture than is acceptable. It works by storing a preceding frame in memory and using it to fill in any bad spots that show up in the video being played. The DOC only affects the video coming out. It has no effect on input. PCM uses the video signal location for recording digital audio and the DOC causes problems when playing back these recordings. This is because it fills in the missing information (drop outs) with digital nonsense. To rectify this problem, Sony added a switch to most of their VCRs for turning off the DOC. The switch location can be inside the front component door or on the back (see bottom pictures). Consult your model's owner's manual for the exact location. Turning ON the PCM switch turns off the DOC circuit. Just the opposite of what you would think. ON if it is off and OFF if is on. (This marry-go-round of switching is explained in the PCM instructions that comes with the unit.) So, turning it off and all the picture processing circuits are on. And that gets in the way of the clear signal coming straight from the Betamax, no matter how good the tape. Having this unaltered signal can work to your benefit in other ways though. Especially when editing from one Betamax to another or making multiple copies. This is because no processing is being performed by the VCR to alter or try to improve the picture. It is just the raw, straight out-of-the-box, unaltered signal. This same strategy is accomplished with an EDIT switch found with some of high-end Betas. It too, turns off the DOC circuit. But forgetting and leaving these switches in the ON position can create a minor headache. Leaving them in the ON position during normal playback lets you see all of the tapes little bugs and imperfections. This is not only annoying but could also mislead one into believing there is something wrong with their VCR. So if you see more than the normal specks or streaks in your picture, check the PCM or EDIT switch to make sure they are in the OFF position, as shown below. To see these switches in action during playback, move them OFF and ON while watching the monitor. Normal position is OFF. Only use these switches to make better VCR to VCR copies or when using a PCM decoder. When making copies to DVD, you will probably want the benefit of the DOC circuit to clean up the video coming out. Once again all the switches shown below are all in the OFF position. To see a list of Beta VCRs that have a dedicated PCM switch click here. Note: All Beta VCRs will record the PCM units output. Playback is where the switches becomes important. To see a list of Beta VCRs that have an EDIT switch, click here. homepage ©Misterßetamax |