MAKING SUPERIOR COPIES WITH YOUR BETAMAX |
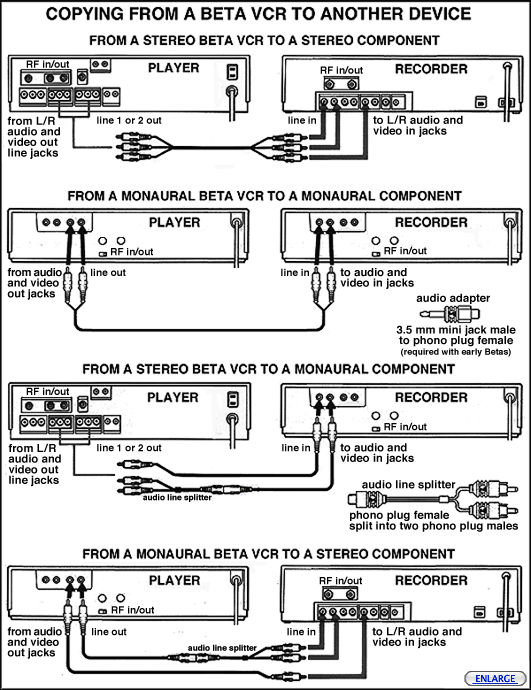
Illustrated below are the four most common methods for connecting a Beta VCR to another component for the purpose of copying or editing. It shows using the line in and out terminals, which is the best option because they produce the cleanest transfer. Using the highest grade audio and video cables are recommended because they reduce the chances of picking up outside interference that can compromise the quality of the transfer. If you are going from stereo to monaural audio a line combiner (referred to as a splitter) will be required to join or divide the source. (See the line splitter illustrated below.) Some models will need a phono plug to mini jack adapter for the audio. (See the adapter illustrated below.) The locations and positioning of the line jacks will vary from model to model depending on the design. To obtain the best quality video from a tape-to-tape transfer turn ON the PCM or EDIT switch. (For copying to DVD consult the information below the illustration.) Copying using the RF coaxial screw in/out terminals is not recommended unless it is the only option. That method uses the tuners which complicates the signal and degrades the picture and sound quality. Use the video/audio line in/out jacks whenever possible. For reference the signal coming from the video out jack is called the composite signal. This means that it has all the components in it to reproduce a complete color picture on a television monitor. For some Beta machines this signal can be handled in a different manner that produces even better tape-to-tape duplication. Click here to learn about the copy option only reserved for the elite of the Betamax family. Be sure to read the information below the graphic. 
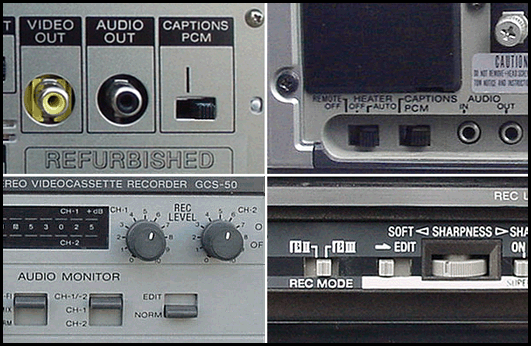
ABOUT THE PCM AND EDIT SWITCHES
Many Sony Betamax recorders have an obscure switch that can help make better copies to another video recorder. It is the PCM switch and is commonly located on the back of the VCR, but not always. What this switch does is turn off the picture processing and correction circuits that are used by all VCRs during playback to create a smooth picture (audio is not affected). Turning ON this switch omits these special circuits so that the signal coming out of the player is unaltered. This results in a tape copy that is as close to the original as the tape will allow. Only Sony Betamax made units the have this switch (this includes the two Pioneer and several Zenith units that were made by Sony). Some higher end Betamax units might also have an edit switch. It accomplishes the same thing but can also include a special circuit for controlling another VCR. So what is this PCM switch and what is it really there for? Read on.
Shortly after the introduction of the Betamax Sony introduced a digital audio processor known as the PCM-F1 (PCM stands for Pulse-Code Modulation). This decoder converted analog audio into binary code (on/off or 1s and 0s). This code was recorded onto a video tape using a Sony SL-2000 VCR (and others) with the VIDEO IN jack. When the recording was played back through the decoder (from the VIDEO OUT jack) the result was near perfect stereo reproduction with no distortion. This method was similar to what was to later become Betahi-fi. (To learn more about the decoder go to FIND and search PCM.) Almost any Beta VCR will record a PCM signal but playing it back properly requires that the Drop Out Compensation circuit or DOC be turned off. What is the DOC? It is a tape defect detection and correction circuit found in all video recorders. It's job is to compensate for minor imperfections in the video tape. It fills in the missing spots with previous information stored in a buffer. Without it you would see more dropouts or streaks in the picture during playback than would be acceptable. It only functions during playback. But the DOC can cause problems for PCM playback. This is because it fills in the missing spots (drop outs) with digital nonsense, which scrambles the audio. To rectify this problem Sony added a switch to many of their VCRs to turn off the DOC circuit. That switch can be located behind the front component door or on the back. Turning the PCM switch to ON turns OFF the DOC circuit. It also turns off the other picture processing circuits that are used during playback. Putting through the signal unaltered from the video out jack can be very beneficial when editing from one Betamax to another, but it might not be desired when doing DVD transfers. This is because with the DOC OFF the video coming out is exactly as it is on the tape, with no corrections or changes. I recommend that when recording from a tape switch the PCM switch back and forth. Watch the video and then decide which looks best. This DOC circuit control is also incorporated into the EDIT switch found on some Betas VCRs (see the pictures below for examples). If you forget and leave these switches ON during normal playback it can be a little misleading. Leaving them ON lets you see all of the little flaws in the video tape. Not only can this be irritating but it can also deceive one into believing there is something wrong with their Betamax. If you see more than the occasional speck or comet in your picture, check the PCM or EDIT switches and make sure they are in the OFF position. Only use these switches for making better copies or when playing through a PCM decoder. (The switches below are shown in the OFF position.) Note: For the precise method and operation for using these switches and the exact cable connections consult the instruction manuals for the devices.
|
|